Saturday, December 2, 2017

Seesaw - Notes from #EdCampR13 Session | #EdCamp

Students can post photos, audio, video, links, text, and and upload files to Seesaw.

Interesting use of Seesaw by teacher who is facilitating: Student filled out a behavior worksheet when she was off task. Then posted a pic of it to Seesaw and did an audio reflection on it. Parents can then see what happened and discuss at home later. (Personal thought: Would this make Seesaw less appealing to the students?)

Up to 10 family members can be given access to see students's work in Seesaw. In one case, a grandmother who lives out of state gets to see her grandchild's work and comments on it all the time. So cool!!! (Might want to let parents know they shouldn't invite someone who might be too judgmental.)

Types of Posts That Can be Made in Seesaw
One teacher shared that she teaches in a low SES area but has 100% participation from parents because they all have smartphones and can use the app! Parents can choose if they want to be notified by email or by an app notification when something is posted by their child. Parents only see their own students' work unless the teacher posts to the blog function. 

Students can comment on each others' work. The comment activity can be toggled on and off for specific activities in Seesaw. Great way to teach digital citizenship and appropriate online behavior. 

Can help students understand that this is their WOW work. Parents don't want to see pics of your shoes or the ceiling, etc.

In September, Seesaw just added the ability for teachers to create activities for students to do. Students complete in Seesaw. Example shown by facilitator was a template she made in Google Slides for demonstrating understanding of a multiplication problem. She downloaded as a PDF then uploaded to the Seesaw activity, and students were able to use the Seesaw tools to create.

Activities can be copied from class to class and even shared via link with another teacher!

Great for accountability! Can pull up activities and see who has completed them, then direct students accordingly.

Can download all activities as PDFs individually or the whole journal. Students could save the PDF to their Google Drive if you aren't using the paid version that allows the journal to follow the student from year to year.


All original work in this post by Sandy Kendell is licensed under a Creative Commons Attribution-NonCommercial-ShareAlike 4.0 International License (CC BY-NC-SA 4.0). Please see specifics on my re-use policy before re-posting/re-using any of my blog content.

Wednesday, November 22, 2017

#iOS11 - QR Code Reader is Built In

If you and your students have access to iPads, iPhones, or iPod Touches running iOS 11, you can now scan bar codes without having to install a QR code reader app!

Just open the Camera app, point it at the QR code you want to read, and press the message that pops up on the screen to visit the website or file the code links to. It's that simple! I demonstrate how easy it is to use the iOS QR code reading function in the video below. 

I also share my all-time favorite QR code reading app, i-nigma, which is compatible with iOS devices (helpful if you have older devices that can't run iOS 11 or even newer devices that just haven't been upgraded yet) as well as Android (which is great in mixed-device environments like you find in  BYOD/BYOT classrooms). 

If you are wondering why anyone would need a QR code reader in their classroom, take a look at my Pinterest board with QR code ideas or my YouTube QR Code playlist. I update both of these when I come across new ideas, so feel free to check them frequently!

If you have ideas for using QR codes in the classroom, please share them in the comments so we can all learn together.


All original work in this post by Sandy Kendell is licensed under a Creative Commons Attribution-NonCommercial-ShareAlike 4.0 International License (CC BY-NC-SA 4.0). Please see specifics on my re-use policy before re-posting/re-using any of my blog content.

Monday, November 20, 2017

Screen Recording is Built in to #iPad & #iPhone Running #iOS11

With the release of iOS 11 in September of 2017 came a great new feature which can have multiple uses in classrooms. The ability to video record what is happening on an iPad or iPhone screen, as well as narrate over the recording, is now a built-in feature of iOS devices.

You may not realize that the screen recording feature is an option because it is not turned on by default when you upgrade to iOS 11. I found out about it through Twitter myself.

Below are instructions for turning on screen recording and using it for the first time.


To turn on the Screen Recording feature, follow these steps:

Tap the Green Circle next to Screen Recording
to enable the function on your iOS device
  • Open the Settings app on your iOS device.
  • Scroll down Control Center and tap on it.
  • Tap on Customize Controls.
  • Under More Controls, tap on the green circle with white plus mark next to Screen Recording.
  • Screen Recording will now be moved up to the Include section of the Control Center settings.

In the Control Center,
press and hold on the 

Screen Recording button
to bring up Audio options.

Access and use the Screen Recording function by:

  • Swiping up from the bottom of your device to bring up the Control Center.
  • Decide if you want audio via the device microphone (your voice) on your recording. Press and hold the white circle icon until the Screen Recording options come up. Then tap the microphone to toggle audio recording on and off. 
  • Tap Start Recording. You will see a 3 second countdown on the screen. Press the Home Button on your device to go back to your device's home screen during that 3 seconds so your recording will start there.
  • You will know recording has started and is ongoing when you see a red bar across the top of your device's screen.
  • To end your recording, tap the red bar at the top of your screen. Then press Stop.

Video Demo of iOS Screen Recording

In the video below, I demonstrate Screen Recording on an iPhone. I also share a few tips for making your screen recording projects better as well as a few ideas for how to get the video off of the device once it is recorded.


Slides From the Video

Since I recorded my video on an iPhone, the information on the slides is kind of small! You can view the slides that are in the video below.


Have you used the iOS Screen Recording feature in teaching and learning? Have your students? If so, please share in the comments so we can learn from your ideas. Thanks!


All original work in this post by Sandy Kendell is licensed under a Creative Commons Attribution-NonCommercial-ShareAlike 4.0 International License (CC BY-NC-SA 4.0). Please see specifics on my re-use policy before re-posting/re-using any of my blog content.

Sunday, November 19, 2017

#GoogleDocs: Suggesting Mode & Ideas for Using it in Learning

Using Suggesting Mode in Google Docs
If you are familiar with Google Docs, you know that you can share documents with collaborators and that multiple people can edit a document at the same time. (If you aren't familiar with sharing and collaborating on documents, watch this well-done tutorial from GCF Learn Free.)

Sometimes, though, you just want to get input on something you've written or have a peer check it over for spelling, grammar, and punctuation mistakes. If you share your Google Doc in the usual way with full editing rights, your editor can wind up changing your original work to an extent that it's hard for you to tell why changes were made or even what changes were made. You could use revision history, but that can be tedious if a lot of edits were made.


Switching to Suggesting Mode

Using Suggesting Mode


To get input on a Google Doc you own while retaining ultimate control of the edits, you can use Suggesting Mode. The key to using Suggesting Mode is to share the document with Can Comment rights instead of Can Edit rights.  The demonstration I put together below shows how to share the document as well as how Suggesting Mode works.

As part of the tutorial, I also elaborate on the following uses of Suggesting Mode in the classroom:
  • Editing practice: General editing or focus on frequent mistakes you’re seeing in student writing
  • Peer editing: essays, lab write-ups, history research, descriptions of math processes
  • Teacher/student writing conferences
  • To learn or review material: Provide students with inaccurate notes or information in a Google Doc and have them Fact Check and correct it using suggesting mode. 
    • The Fact Check idea was sparked by this Edutopia article on alternative note taking strategies: https://goo.gl/1Dh1T3 

I hope the demonstration below is helpful. If you think of more ways to use suggesting mode in teaching and learning, please share them in the comments below.


All original work in this post by Sandy Kendell is licensed under a Creative Commons Attribution-NonCommercial-ShareAlike 4.0 International License (CC BY-NC-SA 4.0). Please see specifics on my re-use policy before re-posting/re-using any of my blog content.

Monday, October 9, 2017

Make Web Pages Easier to Read with Mercury Reader Chrome Extension

When you or your students are reading online for information, a typical web page can look a lot like this:

Reading online can be complicated by all of the
extraneous elements we find on web pages.


There is a tool that can help make reading for information online a less distracting task. It is called Mercury Reader, and it is an extension that can be used in your Chrome web browser.

When you install Mercury Reader, you can click on it to remove all of the extraneous information from a web page you are trying to read. Here is a side-by-side comparison of what an article on CNN.com looks like without Using Mercury Reader, and what it looks like when the extension is being used.


Benefits of Mercury Reader

  • Easy to toggle on and off.
  • Takes away extraneous and possibly distracting information such as ads or links to content which might not be related to the content being read.
  • Allows the reader to adjust font size and style for easier reading.
  • Allows reader to choose a theme which puts white print on a dark background. 
  • Can aid dyslexic or visually impaired readers who are reading content on the web.

How to Use Mercury Reader

Below is a 4 1/2 minute tutorial I recorded which shows how helpful Mercury Reader can be while still being very simple to use. I hope this tool will be of benefit to you and your students. Please take time to comment on this post if you decide to try Mercury Reader or if you have other tips for making reading on the web easier.


All original work in this post by Sandy Kendell is licensed under a Creative Commons Attribution-NonCommercial-ShareAlike 4.0 International License (CC BY-NC-SA 4.0). Please see specifics on my re-use policy before re-posting/re-using any of my blog content.

Sunday, September 17, 2017

Improve Online Reading Comprehension with a Highlight & Right-Click!


Chances are you or your students come across words you don't understand when reading on the . Try as you might to discern the word's meaning using context clues, sometimes the necessary info just isn't there, or you are focused on the task at hand without adequate time to figure out what the word is. There's a super easy and quick way to figure out an unfamiliar word or term you come across online if you are using Google Chrome.


Just Highlight & Right-Click!


Click This GIF to View a Larger Demo of the
Highlight/Right-Click Process
A few minutes ago, I was reading an interesting article on how to get yourself or others to change their mind when I came across a word I was not familiar with: Schadenfreude. So, I did this:
  • Double-clicked the word to select/highlight it.
  • Right-clicked the word and selected Search Google for "Schadenfreude".
  • Read the definition in the new tab that opened up.
  • I also clicked the sound icon under the word to hear how it is pronounced.
    After getting an idea of what the word meant, I returned back to the tab with the article I was reading and carried on.

    Train Yourself & Teach Your Students to Use This Trick

    I encourage you to train yourself and teach your students to use this quick trick for improving vocabulary and comprehension. Teaching a new skill in context when the need arises helps transfer it to long-term learning. Quick and natural in context ways to teach this trick include:
    • When you and your students are discussing online information which you are projecting in front of a group or the whole class, highlight and right-click a word your students seem unfamiliar with.
    • When a student approaches you to ask what a word they are reading online means, talk them through the highlight and right-click trick

    I hope this tip has been helpful! If you know other quick tech tricks that enhance learning, please share in the comments below, so we can all learn together.


    All original work in this post by Sandy Kendell is licensed under a Creative Commons Attribution-NonCommercial-ShareAlike 4.0 International License (CC BY-NC-SA 4.0). Please see specifics on my re-use policy before re-posting/re-using any of my blog content.

    Thursday, July 20, 2017

    Shortcut for Adding Hyperlinks to Google Docs & Slides (Sheets & Drawings, Too!)

    Have you ever discovered that something you usually do with a tech tool in multiple steps can be done far more easily/efficiently in fewer steps? It happens to me all the time! Sometimes, it's just not knowing there's always been another way, and sometimes, a new feature is added to tool and we are just so used to doing things one way we never notice the improvement.

    A recent example for me: I discovered while helping facilitate a session on G Suite Basics earlier this summer that adding hyperlinks in Google Docs and Slides (and Sheets and Drawings) has been massively streamlined. Now, if this is old news to you and it's been around for years, please don't tell me. I don't want to know how long I've been missing out on this shortcut!

    Up until recently, I've been adding links to Google Docs and Slides the same way I always have:
    1. With doc/slideshow open in one Chrome tab, open another Chrome tab.
    2. Search for site I want to link to in new Chrome tab.
    3. Click on site to open it.
    4. Copy URL from browser address bar.
    5. Go back to doc/slideshow.
    6. Highlight words I want to make into a link.
    7. Right-click on words I want to make into a link.
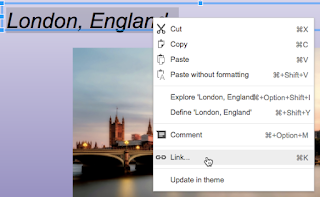
    8. Select Link from the menu that pops up.
    9. Paste URL into link box and apply.
    So, that's nine steps. Not a big deal or burdensome until you realize you could do it in far fewer steps in many cases! I finally noticed it this summer when watching multiple people add links to docs and slides during a professional learning session. 

    Here is the new shortcut method I discovered:
    1. Highlight the words I want to link in the doc or slide.
    2. Right-click the highlighted words and choose Link from the menu that pops up.
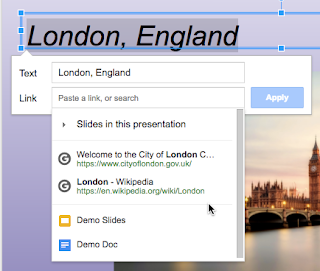
    3. NOTICE the opportunity to pick from a couple of sites Google nicely found for me. Or search from right within the link dialog for the site I want if the suggestions aren't quite right.
    4. Preview the suggested sites if needed. See my quick tutorial video below for a demo of this.
    5. Click on the link I want to use.
    6. Click Apply. DONE!

    That's three to four fewer steps, and a whole lot less clicking and tab switching!!!!

    NOTE: It's still best practice to search ahead of time for quality online resources to link to, as this shortcut method only gives two results to choose from. The shortcut method works well if you are fairly certain of what you're looking for.

    SECOND NOTE: This shortcut process works in Sheets and Drawings, too!

    Because it often helps me to see a demo of a new-to-me skill, I made a short tutorial video on how the process works. You can view it below. I hope you find as much benefit from this shortcut as I have!


    All original work in this post by Sandy Kendell is licensed under a Creative Commons Attribution-NonCommercial-ShareAlike 4.0 International License (CC BY-NC-SA 4.0). Please see specifics on my re-use policy before re-posting/re-using any of my blog content.

    Monday, July 17, 2017

    Real Staffing Percentages in Texas Public Schools


    Source: Texas Education Agency
    Retrieved July 17, 2017

    Earlier today, Kimberly Reeves sent out the following Tweet:


    The myth of the 1:1 public school teacher to administrator ratio strikes again. It is a convenient myth to believe if you are someone who wants to convince the public that their local school districts don't know how to properly prioritize their financial resources. I had a pretty keen sense of déjà vu, since a similar statement by then Texas Governor Rick Perry led me to write about this same issue in 2011.

    I've posted a screen shot above of 2016 staffing statistics as reported by the Texas Education Agency, but just to clarify, here's a quick summary of the classifications of all public school employees by percentage, charter schools included:
    • Central Administration - 1.1%
    • School Administration - 2.9% 
    • Professional Support - 9.8%
    • Teachers - 50.5%
    • Educational Aides - 9.6%
    • Auxiliary Staff- 26.1%

    Comments I made about public education staffing ratios in my 2011 blog post still apply:


    With teachers comprising 50% of the employees of Texas public schools, and administrators only comprising 4%, it can hardly be argued that there is a 1 to 1 ratio of administrators to teachers in our schools. As a professional educator, I myself would be appalled if that were so.

    The 1 to 1 ratio of teachers to administrators only works if you count everyone except teachers as administrators. Lumping professional support, aides, and auxiliary staff in with administrators is inaccurate at best and deceitful at its worst.

    If some of our state leaders are going to question the way public education is run in Texas, they could at the very least use accurate information. The Texas Education Agency maintains an enormous amount of data, and I was able to find the most current snapshot of public education data in less than five minutes, by searching their website from my smartphone. Surely, government staffers could do the same?

    I will close with the graphic below, which shows a snapshot of state staffing percentages from 2010, the last time I addressed this issue on my blog. The percentages haven't changed much. It's time to put the 1:1 teacher to administrator ratio myth to rest. Now. We have enough alternative facts floating around Washington D.C. We don't need them muddying the waters in Texas.

    Source: Texas Education Agency
    Retrieved July 27, 2017


    All original work in this post by Sandy Kendell is licensed under a Creative Commons Attribution-NonCommercial-ShareAlike 3.0 Unported License. Please see specifics on my re-use policy in the right-hand column of my blog before re-posting/re-using any of my blog content.

    Thursday, July 13, 2017

    Ideas for Using the Voice Typing Tool in Google Docs


    Voice typing can help students overcome barriers or lead to new learning opportunities. If you are using Google Docs and have access to a computer, laptop, or Chromebook with a microphone, you have everything you need to get started with voice typing in your classroom.


    Ideas for Using Voice Typing

    • Emerging or developing readers and writers can voice type an assignment or story. Then practice revising and editing skills using traditional keyboard techniques.
    • Students with reading or writing challenges, such as dyslexia or dysgraphia, can use voice typing to help them express their ideas without the barrier of their learning disability.
    • When teaching the difference between the conventions of spoken versus written language, have students compose short sentences or stories or have a conversation using voice typing. Then collaborate to edit the spoken text so it conforms to the standards of written text.
    • Ask students to read aloud a short passage, recording their reading using voice typing. Then, have them compare what was typed to the original text that they read from. This can give students a visual example of their reading accuracy. 
    • When studying the traditions of oral storytelling or the drawbacks of gossip, play a game of telephone. As the message is passed around the room, have each student repeat it by voice typing it into a Google Doc before passing it along verbally to the next student. (Find a way to do this so the students can't see what was previously typed by others.) Visually compare how the story changes from the original to the final version (and the versions in between.)
    When thinking about voice typing in the classroom, what other instructional uses come to mind?

    How to Use the Voice Typing Tool

    If you are not familiar with how to use the Voice Typing Tool in Google Docs, watch the one minute video tutorial I recorded below. For a detailed list of voice typing commands, visit Google Docs Help.


    **********************************************************************************************************
    All original work in this post by Sandy Kendell is licensed under a Creative Commons Attribution-NonCommercial-ShareAlike 3.0 Unported License. Please see specifics on my re-use policy in the right-hand column of my blog before re-posting/re-using any of my blog content.

    Tuesday, July 11, 2017

    Easily Add Emoji to Google Docs & Slides to Engage Students

    Demo of Adding Emoji to a Google Doc


    It's Easy to Add Emojis to a Google Doc or Slide 

    1. Make sure you are clicked in an area in the Doc or Slide where you can add text.
    2. Click on the Insert menu.
    3. Select Special Characters.
    4. If the Emoji aren't showing up in the Insert special characters box,  click the middle drop-down menu in the box and select Emoji.
    5. To insert an Emoji in your Doc or Slide, click on it
    6. You can select different categories of emoji by clicking on the third drop-down menu in the Insert special characters box.
    7. You can adjust an emoji's size by selecting it and changing its font size.


    Ideas for Using Emojis in Instruction

    While we usually think of emojis in the context of texting and social media, they can be a fun way to bring engagement into learning. Here are just a few ideas I've brainstormed:

    • MATH: Teachers can use emojis to illustrate math problems for students to solve. Students can use emojis to illustrate solutions to math problems.
    • WRITING & SOCIAL STUDIES: Challenge students to write sentences or short paragraphs using only emojis. Partner up with others to see if they can correctly "read" the emoji writings. Compare this to the task of interpreting the earliest forms of drawings on cave walls or pictograph writing.
    • WRITING: Use an emoji or string of emojis as a writing prompt. Or ask students to select an emoji that describes the day they are having and then write about it.
    • MEDIA LITERACY: Create a Google Slides presentation with one large emoji on each slide. Show to students and ask for one word that comes to mind when they see the emoji. Discuss the impact of visuals on our thinking. Tie in to studies of entertainment, advertising, or propaganda. Extend the lesson by having students group emojis together in an attempt to evoke specific reactions from viewers.
    • JUST FOR FUN/AESTHETIC EFFECT: Use emojis to enhance presentations, newsletters, and other projects. Discuss if the emojis chosen are appropriate to the purpose of the publication.


    What ideas would you add for using emojis in instruction? I invite you to think about it, then share in the comments below!


    All original work in this post by Sandy Kendell is licensed under a Creative Commons Attribution-NonCommercial-ShareAlike 3.0 Unported License. Please see specifics on my re-use policy in the right-hand column of my blog before re-posting/re-using any of my blog content.

    Thursday, June 29, 2017

    What's Your #ISTE17 Story in 6 Words?

    ISTE 2017 has come to a close. If you are like me,  you are a combination of exhausted and excited by all of the learning and connecting that took place.

    You might also be overwhelmed. I've felt that way some years, as I looked at all of the ways others are innovating with technology for the benefit of student learning and feeling like I or my school or district were woefully behind.

    Or do you have lots of questions? Are you wondering if technology and teaching are moving in the right direction? Maybe you are asking yourself the big, philosophical, "Why?" and "What are the implications of this?" questions.

    I'm always fascinated by what everyone takes away from a giant gathering of educators like ISTE's annual conference. Especially since I get to experience only the smallest slice of what takes place. I want to know what others got out of it. Are you curious, too? Then read on, and let's see if we can collaborate to find out!

    A Challenge For You

    Can you summarize your ISTE experience or thoughts in six words? Not four or five. Not seven or eight. But six? (And yes, words like "the," "and," "or," etc. count!)

    Six words forces you to think deeply about your choices and hone in on the meat of what you learned, took away, or are still wondering about.


    If you are not familiar with the idea of the Six Word Story, this HuffPost article will give you an overview. So will a quick look at the hashtag #6WordStory on Twitter.

    Now, Contribute Your Story!

    I'd like to learn about everyone's learning at ISTE 2017 by curating ISTE 2017 Six Word Stories using Storify. Will you please contribute?  Here is how to contribute your story:
    1. Reply to the Tweet below with your ISTE 2017 Six Word Story.  (Rememberwords like "the," "and," "or," etc. count! I won't include stories that break the six word rule in my curation.)
    2. Include BOTH of these hashtags on your Tweet: #ISTE17 #6WordStory
    3. You can include a photo from the conference that enhances your story if you wish. Just please practice good digital citizenship and make sure it's a photo you took and/or have permission to use.


    Here Are The Stories!

    Please keep contributing! The Storify below will continuously update as new stories are added. 


    **********************************************************************************************************
    All original work in this post by Sandy Kendell is licensed under a Creative Commons Attribution-NonCommercial-ShareAlike 3.0 Unported License. Please see specifics on my re-use policy in the right-hand column of my blog before re-posting/re-using any of my blog content.

    #ISTE17 Day Three

    During the final day of ISTE 2017,  I spent some time perusing the Exhibit Hall in between a great workshop on building digital portfolios with Google Sites and a session on using Open Educational Resources (OER).  So, there were fewer tweets yesterday, and the majority of them were from the OER session.

    As always after a conference like this, my brain is full, I have a lot to contemplate, and my resource kit is more stocked than it was a few days ago.

    I'm thankful for all of the presenters who take time to prepare and share their knowledge and ideas. In his OER session yesterday, Andy Marcinek brought up the fact that we are far to siloed in education. Those of you who make the effort to share at conferences like ISTE and through your tweets and blogs help break through the silos, to the benefit of all learners and educators. Thank you!!!!

    Here are my tweets and the tweets of few others from the last day of ISTE. I hope all who attended, both in person and via Twitter, took away as much or more than I did!


    *********************************************************************************************************
    All original work in this post by Sandy Kendell is licensed under a Creative Commons Attribution-NonCommercial-ShareAlike 3.0 Unported License. Please see specifics on my re-use policy in the right-hand column of my blog before re-posting/re-using any of my blog content.

    Tuesday, June 27, 2017

    #ISTE17 Day Two

    I was contemplating going to the mall
    for lunch when I looked up and saw this!
    My second day of ISTE 2017 was HOT! Great music. Inspirational speaker. Fun learning. And, a REAL FIRE in Downtown San Antonio!

    Fortunately, the fire was mostly an inconvenience, causing the Marriott to be evacuated and the mall to close. And driving me a couple of blocks away to Fuddruckers for lunch to escape the choking smoke. No one was injured.

    See my Storify below for highlights from the day! If you've been at ISTE this year, or if you are learning from afar on Twitter via the #ISTE17 hashtag, what's been something new you've taken away? Take a moment to share in the comments below so we can all learn together!


    ***************************************************************************************************************
    All original work in this post by Sandy Kendell is licensed under a Creative Commons Attribution-NonCommercial-ShareAlike 3.0 Unported License. Please see specifics on my re-use policy in the right-hand column of my blog before re-posting/re-using any of my blog content.

    My First Day at #ISTE17


    June 26, 2017 was my first day at the annual International Society for Technology in Education (ISTE) conference. I've used Storify, one of my favorite social media tools, to summarize my experience by curating my tweets as well as the tweets of others which caught my eye throughout the day. (As click through my story, you can hover on any photos or videos to see the tweets associated with them.)

    ISTE is an amazing conference for educators! Wonderful sessions filled with cool tech tools and deep ways to use them for teaching and learning plus thoughtful panels and conversations on deeper concerns in education. It's hard to put into words! There is abundant sharing from the conference on Twitter. Even if you can't attend in person, follow the #ISTE17 hashtag. You can learn no matter where you are!


    ****************************************************************************************
    All original work in this post by Sandy Kendell is licensed under a Creative Commons Attribution-NonCommercial-ShareAlike 3.0 Unported License. Please see specifics on my re-use policy in the right-hand column of my blog before re-posting/re-using any of my blog content.

    Tuesday, May 23, 2017

    Common Computer Keyboard Shortcuts

    I've been asked more than once in the past few weeks about keyboard shortcuts. Those quick keystroke combinations that can make creating and editing documents a bit faster, especially when they take the place of multiple mouse clicks.

    Some of you out there are keyboard shortcut ninjas. You know and use so many shortcuts that you barely ever touch your mouse!

    I am not quite so skilled, but there are a few shortcuts I've learned over the years that I use often and that are universal to most of the programs I use. I've compiled a list of them below. For simplicity, I've listed only the Windows version of the key combinations, but if you are a Mac user, you can substitute the Command key for the Control (Ctrl) key.


    Ctrl+B
    Make selected text bold
    Ctrl+I
    Make selected text italic
    Ctrl+U
    Underline selected text
    Ctrl+F
    Find text on current web page or in current document, spreadsheet, or PDF
    Ctrl+Z
    Undo your last action (MY ALL TIME FAVORITE!)
    Ctrl+C
    Copy what's selected (text, graphic, table, etc.)
    Ctrl+X
    Cut what's selected (text, graphic, table, etc)
    Ctrl+V
    Paste what you last copied or cut (text, graphic, table, etc.) at the current location of the cursor
    Ctrl+A
    Select all contents of a document, spreadsheet, etc.
    Ctrl+S
    Saves the current document
    Ctrl+P
    Print the current document


    How do you learn these keystroke combinations? By using them! Challenge yourself to try a couple each week. If you are new to keyboard shortcuts, it's helpful to know that you don't have to press both keys at exactly the same time. You can press Ctrl (or Command) first, then press the letter associated with the shortcut. Ideally, you press both keys with fingers of the same hand.

    If you wish you knew a keystroke for a command you use often, check out the menus of the program you're using. I took the screenshot to the right in Google Docs on a Mac. You can see that keyboard shortcut combinations for common commands are listed right in the menu.

    What is your favorite keyboard shortcut? Please share it, or any questions you have, in the comments below.


    ****************************************************************************************
    All original work in this post by Sandy Kendell is licensed under a Creative Commons Attribution-NonCommercial-ShareAlike 3.0 Unported License. Please see specifics on my re-use policy in the right-hand column of my blog before re-posting/re-using any of my blog content.

    Thursday, March 9, 2017

    Protect, Deter, Recover: Data Risks in K12 Schools #SXSWedu

    Protect, Deter, Recover: Data Risks in K12 Schools 
    SXSWedu 2017 Panel

    Hosted by Absolute: Empower K-12 staff, parents and community by learning best-practices for digital citizenship, including device safety and security, cyberbullying and Internet crime. Learn how to promote a healthy environment for students and faculty, including education on device safety and scenarios where they may be at risk; and how to work with local law enforcement to protect devices and data. Harold Reaves, Level V Certified in Homeland Security, shares best practices to protect student-assigned mobile devices and risks regarding social media and the Internet; and education consultant and former IT director can provide real-life scenarios, lessons and best-practices.


    Empower (Educate) K12 Staff, Parents, and Community

    Students don't think much about safety and security. Parents may think a lot about it but don't necessarily know what to do.

    Communities expect we manage devices paid for by their tax money well. There's also an expectation that we protect students when we give them access to devices and send devices home with them. Helping parents have a role and responsibility in this is important.

    Use your website and other communication tools to help educate parents with videos and other modes of information.

    Show that your organization understands their responsibility by making it a community collaboration to help keep students safe.

    Educating community members who are not tech savvy can trickle down and help everyone.


    Digital Citizenship

    Schools and districts often have curriculum for digital citizenship, but it is just as often not implemented because it's not tested.

    Students are connected to devices 24/7. They rarely unplug.

    Digital citizenship cannot be taught one time in drive-by lessons. It has to be continually taught, retaught, and revisited.

    Do students know they should keep their devices out of sight when they aren't using them to protect them?


    Work With Local Law Enforcement to Protect Devices and Data

    When doing a big new tech rollout, get local law enforcement involved from the beginning. They can consult with you on how safe your site is where you are storing the devices. Also it's good to establish the communication with them ahead of time in case technology should disappear later.

    Publicize to the community the security measures you have in place on district devices.  This lets them know you are being a good steward of the resources and also may help deter theft.


    Protect Student-Assigned Mobile Devices

    Teach students how to treat them properly: carry them, store them, etc.

    Data Risks

    Are we teaching data backup? What happens if a child drops and breaks their device. Teach good data stewardship.


    Find Partners to Help You With Awareness Programs

    Pro-active training strengthens the reputation of your program and builds public confidence. Districts can demonstrate they have taken measures.

    Absolute has developed a curriculum for mobile device safety training.


    What do you thing is the most common security issue facing students and teachers today?

    Device security.

    Putting out too much info on the internet. Lack of awareness of how this could endanger them.

    Not thinking about how much personal information they are giving over to apps and extensions when they install them. (Think of all the access an extension might ask for when you install it in your browser. Do we ever even read that?)

    Recommended video: Privacy is Dead; Get Over It


    Online Resources

    • Common Sense Media
    • Digtal Citizenship Webquest
    • Tech Learning
    • Elements of Digital Citizenship
    • Edutopia
    • Microsoft Security and Safety Site
    • Raising a Digital Child


    Absolute Resources


    • IDC White Paper
      Student Technology Analytics: How K12 Leaders Make the Case for Better Technology in the Classroom
    • Safe Schools Program
      Absolute Safe Schools Program Helps Promote Safe Digital Citizenship
    • www.absolute.com 


    *********************************************************************************All original work in this post by Sandy Kendell is licensed under a Creative Commons Attribution-NonCommercial-ShareAlike 3.0 Unported License. Please see specifics on my re-use policy in the right-hand column of my blog before re-posting/re-using any of my blog content.

    Personalized Learning and the Tech to Make It Happen #SXSWedu

    Personalized Learning and the Tech to Make It Happen
    SXSWedu 2017 Panel


    One of the most promising ideas in education right now is personalized learning—providing instruction that is meaningful and contextualized for every student. The rapid growth of edtech is making it easier to transform schools and classrooms into environments that support individualized learning, but success requires a thoughtful, strategic approach. Join education experts working with schools all over the country to pilot new technologies in support of personalized learning. Educators will learn how to replicate success happening in cities like Chicago and Boston and edtech practitioners will get real-world insights on the way technology is being used in today’s classrooms.


    What does personalized learning mean?

    It's an umbrella term for a variety of approaches to learning. It is the next phase of differentiation which brings in student voice and choice.

    It's an opportunity for the highest achievers to take off and students who are struggling to move forward. To identify what each learner really needs.

    Understanding students in terms of strengths, needs, and interests. Start with the child first instead of the curriculum. Just because I'm born in a certain year I don't necessarily need to be in a group of students my same age. Also understanding that learning is social. Go beyond the four walls of the school to connect.

    It is not students sitting in front of individual computers with headphones all the time.


    Where do schools start?

    A team of teachers with a supportive principal that are going to pilot for the rest of the school. If they are successful, others will follow.

    Find your WHY first. These are curriculum and student experience decisions.

    It's a paradigm shift. No longer teaching to the middle. It's about getting to know kids and what they need.

    One problem is schools and districts don't think about the plumbing first. Are 30 computers accessing WiFi going to crash the network? Are the computers older than the students? Technology funding needs to be a priority with built in refresh cycles. Make sure you know what your infrastructure is now and where it needs to go.

    Don't forget student privacy policy. What will happen with the student data? Make sure it won't be sold.

    You need a trusted adviser to assess what's going on.


    It's not really the technology, it's the constructs around it. The vision.

    McCormick Middle School in Boston had challenges with their technology. But teachers embraced working with an edtech product to understand exactly what they needed.  Their interest and passion has resulted in the district investing more in their school. They are moving along a continuum to get closer to student voice and choice and ownership of their learning. With more data, students were able to take on more ownership than they had when grades were the only means of assessment.


    Is 100% student voice and choice crucial for personalized learning to happen?

    Sometimes the pendulum swings too far. Developmental age is important in these decisions. Rigor and top quality work are still important. Teachers must still be mentors, coaches personal trainers.

    We still need to set learning goals. Unfettered choice can leave students not knowing where to start or end.


    What are some of the pitfalls?

    It's hard to know what's going to change about your teaching before you begin using new tools, such as adaptive learning technologies. It's messy work.

    It's more than the teacher. The school board, superintendent, assistant super of academics, principal, etc, need to access the data and use it to make decisions.

    You can add too many tools to the menu. You have to refer to your why and keep a coherent strategy. What are you using tech and nontech and clean the closet of tools that aren't helping. SIMPLIFY.

    We over-invest in the tool and the technology. Make sure you are investing heavily in professional learning.

    There may be 1000s of edtech tools out there, but only a handful have shown to add value. Stop buying CRAP and look for robust tools. 

    Schools need to be interested in and make use of research.

    Paradigms for rapid-cycle trials and feedback on tools need to be used so developers can keep the tools relevant and make them stick.

    A lot of the work is change in teacher philosophy and practice.

    Test scores cannot be the end all be all of judging program/product efficacy.


    What are some challenges?

    Defining efficacy and going beyond the test.

    Standards don't need to be relaxed for this to work.

    There will probably be a backward slide in achievement in the beginning.


    How should tech support personalized learning in schools?

    It should allow you to scale personalized learning by bringing some part of the instructional process to where the student is.

    It should drive human interaction. A deep assumption that there is a teacher or adult involved and there is high quality interaction with them. Data should be empowering the teacher to meet the needs of the students.


    What are your favorite tools for personalized learning?


    • Lexia learning in elementrary grades.
    • Think Circa for writing.
    • SeeSaw
    • Padlet


    What does tech infused personalized learning look like in practice?

    A busy classroom with lots of things going on at the same time!

    Teachers can know a kid is having a question/struggle before they even raise their hand.


    *********************************************************************************All original work in this post by Sandy Kendell is licensed under a Creative Commons Attribution-NonCommercial-ShareAlike 3.0 Unported License. Please see specifics on my re-use policy in the right-hand column of my blog before re-posting/re-using any of my blog content.

    Wednesday, March 8, 2017

    CS for All: Teaching CS in Elementary Schools #SXSWedu #CSForAll

    CS for All: Teaching CS in Elementary Schools 
    SXSWedu 2017 Workshop

    As the Computer Science for All initiative jump starts around the world, more students in grades 6-12 have the opportunity to take computer science courses. Early exposure to computer science is critical to addressing equity in technology education, so how do we ensure that we are meeting the needs of a diverse pipeline of K-5 students who are ready, willing, and excited to learn CS? Join representatives from the NYCDOE CS4All team, the SF Unified School District, and the Austin Independent School District to explore specific pedagogical approaches, equity and implementation strategies, and lesson plans and resources to infuse CS into the elementary school classroom.


    Agendabit.ly/CSforAllinElementary

    Slides & Actvities: https://goo.gl/0h4wrE

    Table Discussion: What are the equity issues in computer science education where you live?

    • Access to teachers who are knowledgeable about CS and its opportunities.
    • In a low SES district, teachers worry so much about the basics they don't think there is time/need to move on to more advanced concepts.

    Unplugged Activities: Programming without devices.

    • Have groups of students create a list of steps to accomplish something. (Ex: How to make a PB & J sandwich.) Have other groups try to follow the steps and/or debug instructions.
    • Relay Programming: In a relay race, have groups of students write directions on how to recreate a graphic.
    Paired Programming
    • Using a tool like Code Studio, students work in pairs. One drives the device, and the other navigates (gives directions). Students switch roles frequently to complete simple programs.
    Interdisciplinary CS With Robot Mouse
    • Video of Robot Mouse: https://www.youtube.com/watch?v=_tGb9bLe0YA
    • Program Robot Mouse to navigate on a grid of numbers to the sum of two rolled dice. Challenge: Change to multiplication.
    • Program Robot Mouse to navigate on a grid of letters to spell a word with greater than 3 letters by navigating to each letter in sequence. Challenge: Perform an action on each letter.
    • Program Robot Mouse to navigate a map of your community.
    • Program two Robot Mice to perform symmetrical movements.


    I enjoyed this session! The hands-on helped me visualize using CS in core subjects!


    *********************************************************************************All original work in this post by Sandy Kendell is licensed under a Creative Commons Attribution-NonCommercial-ShareAlike 3.0 Unported License. Please see specifics on my re-use policy in the right-hand column of my blog before re-posting/re-using any of my blog content.