Thursday, July 20, 2017

Shortcut for Adding Hyperlinks to Google Docs & Slides (Sheets & Drawings, Too!)

Have you ever discovered that something you usually do with a tech tool in multiple steps can be done far more easily/efficiently in fewer steps? It happens to me all the time! Sometimes, it's just not knowing there's always been another way, and sometimes, a new feature is added to tool and we are just so used to doing things one way we never notice the improvement.

A recent example for me: I discovered while helping facilitate a session on G Suite Basics earlier this summer that adding hyperlinks in Google Docs and Slides (and Sheets and Drawings) has been massively streamlined. Now, if this is old news to you and it's been around for years, please don't tell me. I don't want to know how long I've been missing out on this shortcut!

Up until recently, I've been adding links to Google Docs and Slides the same way I always have:
  1. With doc/slideshow open in one Chrome tab, open another Chrome tab.
  2. Search for site I want to link to in new Chrome tab.
  3. Click on site to open it.
  4. Copy URL from browser address bar.
  5. Go back to doc/slideshow.
  6. Highlight words I want to make into a link.
  7. Right-click on words I want to make into a link.
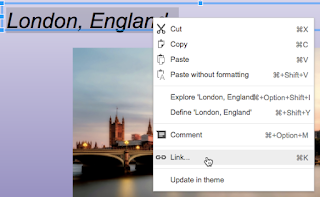
  8. Select Link from the menu that pops up.
  9. Paste URL into link box and apply.
So, that's nine steps. Not a big deal or burdensome until you realize you could do it in far fewer steps in many cases! I finally noticed it this summer when watching multiple people add links to docs and slides during a professional learning session. 

Here is the new shortcut method I discovered:
  1. Highlight the words I want to link in the doc or slide.
  2. Right-click the highlighted words and choose Link from the menu that pops up.
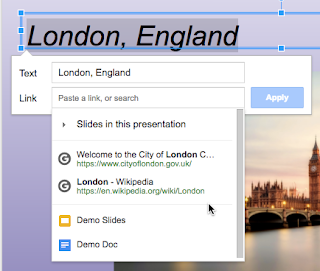
  3. NOTICE the opportunity to pick from a couple of sites Google nicely found for me. Or search from right within the link dialog for the site I want if the suggestions aren't quite right.
  4. Preview the suggested sites if needed. See my quick tutorial video below for a demo of this.
  5. Click on the link I want to use.
  6. Click Apply. DONE!

That's three to four fewer steps, and a whole lot less clicking and tab switching!!!!

NOTE: It's still best practice to search ahead of time for quality online resources to link to, as this shortcut method only gives two results to choose from. The shortcut method works well if you are fairly certain of what you're looking for.

SECOND NOTE: This shortcut process works in Sheets and Drawings, too!

Because it often helps me to see a demo of a new-to-me skill, I made a short tutorial video on how the process works. You can view it below. I hope you find as much benefit from this shortcut as I have!


All original work in this post by Sandy Kendell is licensed under a Creative Commons Attribution-NonCommercial-ShareAlike 4.0 International License (CC BY-NC-SA 4.0). Please see specifics on my re-use policy before re-posting/re-using any of my blog content.

Monday, July 17, 2017

Real Staffing Percentages in Texas Public Schools


Source: Texas Education Agency
Retrieved July 17, 2017

Earlier today, Kimberly Reeves sent out the following Tweet:


The myth of the 1:1 public school teacher to administrator ratio strikes again. It is a convenient myth to believe if you are someone who wants to convince the public that their local school districts don't know how to properly prioritize their financial resources. I had a pretty keen sense of déjà vu, since a similar statement by then Texas Governor Rick Perry led me to write about this same issue in 2011.

I've posted a screen shot above of 2016 staffing statistics as reported by the Texas Education Agency, but just to clarify, here's a quick summary of the classifications of all public school employees by percentage, charter schools included:
  • Central Administration - 1.1%
  • School Administration - 2.9% 
  • Professional Support - 9.8%
  • Teachers - 50.5%
  • Educational Aides - 9.6%
  • Auxiliary Staff- 26.1%

Comments I made about public education staffing ratios in my 2011 blog post still apply:


With teachers comprising 50% of the employees of Texas public schools, and administrators only comprising 4%, it can hardly be argued that there is a 1 to 1 ratio of administrators to teachers in our schools. As a professional educator, I myself would be appalled if that were so.

The 1 to 1 ratio of teachers to administrators only works if you count everyone except teachers as administrators. Lumping professional support, aides, and auxiliary staff in with administrators is inaccurate at best and deceitful at its worst.

If some of our state leaders are going to question the way public education is run in Texas, they could at the very least use accurate information. The Texas Education Agency maintains an enormous amount of data, and I was able to find the most current snapshot of public education data in less than five minutes, by searching their website from my smartphone. Surely, government staffers could do the same?

I will close with the graphic below, which shows a snapshot of state staffing percentages from 2010, the last time I addressed this issue on my blog. The percentages haven't changed much. It's time to put the 1:1 teacher to administrator ratio myth to rest. Now. We have enough alternative facts floating around Washington D.C. We don't need them muddying the waters in Texas.

Source: Texas Education Agency
Retrieved July 27, 2017


All original work in this post by Sandy Kendell is licensed under a Creative Commons Attribution-NonCommercial-ShareAlike 3.0 Unported License. Please see specifics on my re-use policy in the right-hand column of my blog before re-posting/re-using any of my blog content.

Thursday, July 13, 2017

Ideas for Using the Voice Typing Tool in Google Docs


Voice typing can help students overcome barriers or lead to new learning opportunities. If you are using Google Docs and have access to a computer, laptop, or Chromebook with a microphone, you have everything you need to get started with voice typing in your classroom.


Ideas for Using Voice Typing

  • Emerging or developing readers and writers can voice type an assignment or story. Then practice revising and editing skills using traditional keyboard techniques.
  • Students with reading or writing challenges, such as dyslexia or dysgraphia, can use voice typing to help them express their ideas without the barrier of their learning disability.
  • When teaching the difference between the conventions of spoken versus written language, have students compose short sentences or stories or have a conversation using voice typing. Then collaborate to edit the spoken text so it conforms to the standards of written text.
  • Ask students to read aloud a short passage, recording their reading using voice typing. Then, have them compare what was typed to the original text that they read from. This can give students a visual example of their reading accuracy. 
  • When studying the traditions of oral storytelling or the drawbacks of gossip, play a game of telephone. As the message is passed around the room, have each student repeat it by voice typing it into a Google Doc before passing it along verbally to the next student. (Find a way to do this so the students can't see what was previously typed by others.) Visually compare how the story changes from the original to the final version (and the versions in between.)
When thinking about voice typing in the classroom, what other instructional uses come to mind?

How to Use the Voice Typing Tool

If you are not familiar with how to use the Voice Typing Tool in Google Docs, watch the one minute video tutorial I recorded below. For a detailed list of voice typing commands, visit Google Docs Help.


**********************************************************************************************************
All original work in this post by Sandy Kendell is licensed under a Creative Commons Attribution-NonCommercial-ShareAlike 3.0 Unported License. Please see specifics on my re-use policy in the right-hand column of my blog before re-posting/re-using any of my blog content.

Tuesday, July 11, 2017

Easily Add Emoji to Google Docs & Slides to Engage Students

Demo of Adding Emoji to a Google Doc


It's Easy to Add Emojis to a Google Doc or Slide 

  1. Make sure you are clicked in an area in the Doc or Slide where you can add text.
  2. Click on the Insert menu.
  3. Select Special Characters.
  4. If the Emoji aren't showing up in the Insert special characters box,  click the middle drop-down menu in the box and select Emoji.
  5. To insert an Emoji in your Doc or Slide, click on it
  6. You can select different categories of emoji by clicking on the third drop-down menu in the Insert special characters box.
  7. You can adjust an emoji's size by selecting it and changing its font size.


Ideas for Using Emojis in Instruction

While we usually think of emojis in the context of texting and social media, they can be a fun way to bring engagement into learning. Here are just a few ideas I've brainstormed:

  • MATH: Teachers can use emojis to illustrate math problems for students to solve. Students can use emojis to illustrate solutions to math problems.
  • WRITING & SOCIAL STUDIES: Challenge students to write sentences or short paragraphs using only emojis. Partner up with others to see if they can correctly "read" the emoji writings. Compare this to the task of interpreting the earliest forms of drawings on cave walls or pictograph writing.
  • WRITING: Use an emoji or string of emojis as a writing prompt. Or ask students to select an emoji that describes the day they are having and then write about it.
  • MEDIA LITERACY: Create a Google Slides presentation with one large emoji on each slide. Show to students and ask for one word that comes to mind when they see the emoji. Discuss the impact of visuals on our thinking. Tie in to studies of entertainment, advertising, or propaganda. Extend the lesson by having students group emojis together in an attempt to evoke specific reactions from viewers.
  • JUST FOR FUN/AESTHETIC EFFECT: Use emojis to enhance presentations, newsletters, and other projects. Discuss if the emojis chosen are appropriate to the purpose of the publication.


What ideas would you add for using emojis in instruction? I invite you to think about it, then share in the comments below!


All original work in this post by Sandy Kendell is licensed under a Creative Commons Attribution-NonCommercial-ShareAlike 3.0 Unported License. Please see specifics on my re-use policy in the right-hand column of my blog before re-posting/re-using any of my blog content.